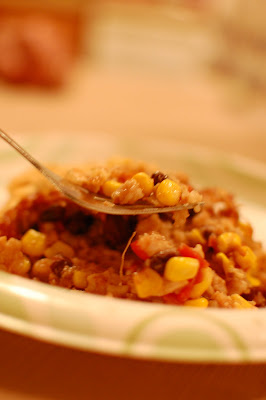
This is (are you ready?) shepherd's pie with crescent roll topping. You can use the store-bought crescent rolls if you would like to. But I wouldn't like to. Probably because store-bought rolls contain enriched bleached flour, partially hydrogenated soybean and/or cottonseed oil, and several color additives. Not on my list of favorite ingredients.
To make a homemade crescent roll topping...
Mix 2 cups whole wheat flour, 1/2 tsp salt, 1 Tablespoon sugar, and 2 1/4 tsp quick-rising or bread machine yeast in a bowl. In a larger bowl, mix 1/4 cup warm water and 1/2 cup warm milk. Pour the dry into the wet, mixing with a fork. When everything is incorporated, use your hands to mix in 2 Tablespoons of softened butter. Knead for 2 or 3 minutes; place in bowl and cover with a cloth for 45 minutes.
While the dough is rising, prepare the rest of the pie. Cut an onion into strips and saute them in a tablespoon of olive oil. After a couple of minutes add a pound of lean ground beef. Then get to choppin'...
3 to 4 carrots
2 zucchini
3 small red potatoes
1 package mushrooms
4 cloves garlic
Once the meat is brown, add the veggies to the pot and let them cook for a few minutes. Then stir in a few tablespoons of flour, followed by a can of beef broth. Add salt, pepper, basil (or other herb), and a few dashes of hot sauce. Let the sauce thicken while the crescent dough finishes rising.
After the 45 minutes are up, take the dough and flatten it out. Cut it into thin strips. Dump all the beef and vegetables into a large casserole, and top with the strips of dough.
Put in a 400 degree oven for 30 minutes. This is one of those meals that I like to fix a few hours ahead of time and let it sit in the oven until suppertime.
Notice the chunk missing in the corner. That was Little Bit's supper. She LOVED it.
Enjoy!
"So whether you eat or drink, or whatever you do, do it all for the glory of God." 1 Corinthians 10:31
Saturday, January 29, 2011
Wednesday, January 26, 2011
Spaghetti Squash
My favorite squash ever is butternut squash. (Check out the most amazing butternut squash recipe here.) But my second favorite squash is spaghetti squash...and this is by far the most entertaining squash you will ever eat.
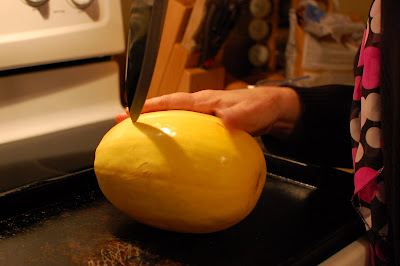
Start by splitting the squash in half lengthwise. You will need one spaghetti squash for every two people. Beware: it is called a "hardsquash" for a reason. But the work is worth it. If you pop the whole squash in the microwave for about a minute and a half before cutting it, it softens just enough to save you a little frustration.
When you split it open you will see lots of pulp and seeds.
Scrape all the gunk out with a spoon.
Drizzle a little olive oil over the squash and season with salt and pepper. Put the squash on a baking sheet, cut side up, and put it in a 375 degree oven for one hour.
While the squash is cooking, prepare your toppings. You can put anything you like on top...the possibilities are endless. This time I made three different options: I chopped and sauteed a package of button mushrooms; I browned some lean ground beef; and I made a red sauce out of tomato sauce, grated garlic, oregano, and marjoram. I have also used sausage as well as chicken before, and all of it tastes great with spaghetti squash.
Here is the fun part.
When you are ready to eat, you serve everyone their own little ready made "bowl." Take a fork and just start to scrape the sides and bottom...
It comes up just like spaghetti noodles!
Once your "noodles" are ready, top it off! I personally used all of the above toppings, plus mozzarella cheese. I always use cheese.
The most fun you will ever have eating squash, I promise. Enjoy!
Tuesday, January 25, 2011
Southwest Chicken Bake
This is a "clean the pantry" meal. It is the result of my asking, "What do we have in the house that would allow me NOT to get out on a rainy day and go to the grocery store?" The answer: 2 split chicken breasts, already cooked but not yet shredded or chopped; frozen corn; a can of black beans; a can of chicken broth; hot sauce; brown rice. And when this is what you have, this is what you can do...
Melt 2 Tablespoons butter over medium heat in a large saucepan. Sprinkle 4 Tablespoons flour over melted butter; let it cook out for a minute or so, then stir in 1 can chicken broth and about 1/3 cup or so of hot sauce. Cook 1 cup dry brown rice separately. Add chopped chicken, a cup of frozen, fresh, or canned corn, and a can of black beans to the hot sauce mixture. Once the rice is done, add that as well. Stir it all together and pour into a casserole.
Top with cornbread batter. I was running low on cornmeal so I used what I had, which was a little shy of a cup, and then a little over a cup of unbleached all purpose flour. Add 2 tsp baking powder, 1/2 tsp salt, 1/4 cup demarara sugar, 1 egg, and 1 cup milk (no oil necessary). Mix and spoon over the whole casserole.
Bake in a 400 degree oven for 45 minutes. I like to cook it early and then cut the oven off and leave the casserole in until suppertime. I think the flavors mix together better that way.
Southwest chicken with cornbread crust. Pretty darn good for a clean-the-pantry meal. Enjoy!
Monday, January 24, 2011
Asian Style Cubed Steak
We had some cubed venison in the freezer, and here is the problem...I don't love cubed venison. I love love love deer burger and deer sausage, but other than that I'm not a huge fan of deer meat. I've just found one way to cook cubed deer and I didn't really want it again tonight. So I found a recipe from Rachael Ray's website and adapted it a teeny bit to fit my ingredients and style.
Heat 2 Tablespoons olive oil in large skillet. Sprinkle flour onto cubed steak. Place in skillet and brown on both sides. Cut into strips or pieces and put in crockpot.
Chop an onion, a red bell pepper, and an orange bell pepper into strips; put on top of steak in crockpot.
Grate several cloves of garlic and a two-inch piece of peeled ginger root over the pot.
Pour one cup of tomato sauce, 3/4 cup reduced sodium soy sauce, 4 Tablespoons brown sugar, and black pepper over everything. Cover and turn on low for 6-8 hours.
A little less than an hour before serving, prepare rice and let it cook according to package directions.
Serve steak and veggies over rice, with steamed or roasted broccoli on the side.
I have to admit, it was really good. The steak was so tender it pretty much fell apart in my mouth.
The end. Enjoy!
Wednesday, January 19, 2011
Vegetable Super Soup
Why so super?
1. It's super easy.
2. It's the only thing I want when I'm sick. Which I am today. So I ate vegetable soup.
Heat a tablespoon of olive oil over medium heat in a large pot. Finely chop 1 onion and drop it in to saute while you chop the other veggies...
4 carrots
2-3 zucchini
1 red bell pepper
4 cloves garlic
Drop all the veggies in as you chop them. Add to the pot...
1 can chickpeas, drained
1 can diced tomatoes, undrained
1 32oz box chicken broth
Salt, pepper, and chili powder to taste
Bring to a boil and then reduce heat. Let it simmer for an hour or two. Fifteen minutes before serving, drop about 3/4 cup of orzo (little rice-shaped pasta) into the pot. You may need to add a little water at this point. I found whole wheat orzo at Food Lion, but I've never seen it anywhere else. That sentence may have been out of order. Oh well.
Soup is so good.
Enjoy!
Tuesday, January 18, 2011
Mushroom and Meatball Pasta
What do you do when you have one person that would have a really hard time calling a dish a "meal" if it didn't have some sort of meat in it, and another person who would rather not eat meat at all?
Make mushroom and meatball pasta.
To make the mushroom pasta:
Heat about a tablespoon of olive oil in a large saucepan. Saute 2 packs of mushrooms, chopped, for about 5 to 7 minutes. Go for a walk on the wild side and mix up the types of mushrooms you are using. True, button mushrooms are the least expensive, so use one pack of buttons and then take your pick for the other ones. I used baby bellas...because they were the second least expensive.
Mushrooms are full of vitamin D and are immune-boosters. I heart mushrooms.
After you have sauteed the mushrooms for a few minutes, sprinkle a couple of tablespoons of flour over them.
Let it cook out for about a minute, stirring constantly, and then (slowly) stir in around 2 cups of beef or chicken broth, depending on what meat you use for your meatballs (use chicken broth for poultry, beef broth for red meat.) Add some salt, pepper, garlic powder, and chili powder. When you drop the pasta (see below), go ahead and stir in one box or half a bag of frozen chopped spinach into the mushroom mixture.
About 10 minutes before eating time, go ahead and cook up a box of whole wheat angel hair pasta, drain well, and stir into the mushroom mixture.
To make the meatballs:
Start with about a pound of lean ground meat of your choice. In my opinion, red meat works best in this dish (so use ground venison or ground sirloin), but if you prefer white meat go for the ground turkey or chicken breast. BUT be careful when getting your meat. Just because it is ground turkey or chicken does NOT make it "healthy" or lean. Make sure it is made from the white meat of the bird and preferably says "99% lean." Some of the turkey you can get is just as bad as greasy hamburger meat.
Take your rings off your fingers. Put them in a safe place (i.e., away from the drain in the kitchen sink.)
Put the meat in a large bowl. Add...
1 cup whole wheat breadcrumbs (I actually used about 1/3 cup breadcrumbs, 1/3 cup wheat bran, and 1/3 cup oat bran; you could also use wheat germ, toasted oats, or another fiber source if you have it in your pantry. Pour a little milk in the breadcrumb mixture and let it soak for a minute before adding it to the meat.)
Your favorite herbs and spices...I used chili powder, garlic powder, and oregano.
A couple of splashes of Worcestershire sauce
Mix it all up with your hands. Shape it into little meatballs. Mine were about an inch and a half or so in diameter; I made 26 meatballs out of one pound of meat. Place on a lightly oiled pan. Drizzle a teeny bit of olive oil on top of the meatballs. Place in 400 degree oven and bake for 20 minutes.
To summarize, here's the order in which I completed the steps:
1. Prep the meatballs and get them on the pan. Set aside and preheat the oven.
2. Chop and saute the mushrooms.
3. Add flour to mushrooms.
4. While the flour cooks out for one minute, put meatballs in oven.
5. Stir broth into mushrooms.
6. Heat up water for noodles.
7. When meatballs have 10 minutes left, cook pasta and also stir spinach into mushrooms.
8. After about 6 minutes, drain pasta and add to mushrooms.
9. Pull the meatballs out and eat!
Meateaters can add meatballs to their pasta to their hearts' content; non-meatlovers can avoid them like the plague.
I like meatballs.
Little Bit approves of this meal, too.
What more could I ask for? Enjoy!
Monday, January 17, 2011
Chicken and Cheese Quesadillas
My dad loves to eat at the local Mexican restaurant. I was pretty intimidated to try to imitate his favorite dish in a "new, improved, healthier" version, but I decided to go for it. And, in his own words, he just said, "I tell you what. That stuff you made last night...It was really good." What more could I ask for?
The idea of a quesadilla is pretty simple - chicken and cheese stuffed between two tortillas. The tricky part is the sauce. I looked up all kinds of quesadilla sauce recipes and they all called for mayonnaise.
I do not do mayonnaise. Not only is it really bad for you, it is also really gross.
So here was my solution:
2 Tablespoons plain nonfat yogurt
3 Tablespoons low-fat cream cheese
1 Tablespoon salsa
Mix together and chill. This is enough sauce for 3 to 4 quesadillas. Spread the sauce on one side of one whole wheat tortilla; top with a little bit of shredded Mexican style cheese (I used 2% cheese); top that with some shredded chicken (I used leftovers from a roasted chicken recipe that I plan on posting very soon); top with more cheese; and put the other tortilla on top.
I used my mom's panini press to cook these. A George Foreman would work great, and I am sure it can be done in the oven or even in a skillet on the stovetop as well.
I don't have a picture. They were eaten too fast. Enjoy!
Friday, January 14, 2011
Chicken and White Bean Chili
Do you like chili? I looooooove chili. I love it on cold nights and during college football games and on evenings in with the Coach. This is a different twist on the classic.
To thicken the chili, I start by melting 1 Tablespoon of butter over medium heat. To the melted butter add 2 tablespoons of flour; stir it around for about a minute and then slowly pour in 1 box (or 2 cans) of chicken broth.
The "pour it in slowly" part is really hard for me. I know that the more slowly I pour it in, the thicker it will be. And I start off well. I pour a teeny bit, stir it around, and experience the delight of actually seeing it thicken right before my eyes. I pour a little more in...and then realize that at this rate I will still be pouring it in when it's time to eat. So then I just dump it. Oh well.
Next add the main ingredients...
2 cans of white beans (I used 1 can northern beans and 1 can cannelini beans)
2 cooked chicken breasts, chopped or shredded
3-4 cloves of garlic, minced or grated
1 cup of salsa (I used a mixture of medium and mild. Because that's what was in the fridge. Next time I think I will use all medium.)
1 cup of shredded cheese (I used mozzarella. Again, because that's what was in the fridge. But I bet cheddar would be really good.)
1/2 tablespoon cumin
1/2 tablespoon chili powder
And let it simmer for 20 or 30 minutes. Or in my case, a couple of hours, because this is one I can make during Little Bit's nap. Scoop it into a bowl, add some crushed tortilla chips on top...
And then eat it. Eat it all. Enjoy!
Thursday, January 13, 2011
Butternut Pasta
This is...are you ready for it???...my FAVORITE meal. Possibly ever. I know that's a huge statement. And I might make that statement about other meals as well. But then I eat this one, and I know without a doubt, that this is the one, for at least four reasons...
1. The Butternut Squash
Have you ever had this delectable winter squash? If you haven't, you need to stop reading this post, go to the nearest grocery store, buy one, and then come back and finish reading. I really want you to be as in love with butternuts as I am.
They are so lovely.
To begin, peel the squash. Definitely with a vegetable peeler. The first time I worked with a butternut, I tried to use my not-so-sharp paring knife, and I ended up with frustration, a big mess, and maybe two square inches of butternut squash to cook. No, the skin is very tough, so just save yourself the grief and peel it the easy way.
Then cube the squash. I do this in two stages. First, I cut off the long cylinder-shaped top portion, cut it into about half-inch slices, and then cube each slice. Then I take the round bottom part, cut it in half lengthwise, scoop out the pulp and seeds, and cube the rest of it. Yes, it is a lot of work. Yes, butternut squash is really tough to cut. Yes, it is totally worth it.
Once it is all cubed up to the best of your ability, put it on a pan with little sides. Is this a cookie sheet? Is it a jelly roll pan? I don't know. Drizzle with olive oil, toss it around, sprinkle salt and pepper, and put it in a 425 degree oven for, oh, 35-45 minutes. Until it starts to get brown and crispy around some of the edges.
Mmmm.
2. The Sausage
Tonight when I made this dish, I used 3 links of Italian style turkey sausage because that's what I had left from the package I used to make lentil stew earlier this week. But for the most amazing butternut pasta ever, use deer sausage.
Cube it up and brown it in a skillet.
Sausage is wonderful.
3. The Pasta
Confession: If I ate pasta every day, I would be happy. I am a happy person. Logical conclusion: I eat pasta (almost) every day.
Use whole wheat elbow macaroni. It's the bomb. And remember to salt the boiling water before you put the pasta in.
4. The Butter
This is the secret ingredient running behind all the flavors in this dish. Once the pasta is cooked, pour it in the drainer and let it hang out while you return the pot to the stove. Over medium heat, melt a tablespoon of butter. Shake in your favorite herbs...I used thyme, oregano, and basil. Let the butter melt and absorb all the herbs. It will even start foaming a little. It's so cute.
Keep stirring it around so it doesn't burn. You'll know it's ready when you drop one little pasta elbow into the butter and it sizzles - then pour all the pasta in (SIZZLE) and stir it around to coat all the pasta in the herb-butter.
Oh. My. Goodness.
Final step: Add the perfectly browned sausage; the perfectly roasted butternut squash; and a perfect handful of shredded parmesan cheese to the pot. Stir it all around.
Amazingness.
Once you take one bite of this, you will die. In the best way possible. Enjoy!
Wednesday, January 12, 2011
Chicken Teriyaki
There's this Japanese restaurant in my hometown. Their chicken teriyaki is sooooo good. After I eat it, I feel sooooo bad.
I wish you could make restaurant-style meals in your own kitchen, in a way that actually makes you feel good after you're done eating.
Oh, wait. You can.
The title may be a bit misleading. I generally don't keep teriyaki sauce in the house, but I always have a good bottle of reduced-sodium soy sauce. I really like the flavor of soy sauce better anyway. But you could definitely use those two sauces interchangeably, depending on which one you prefer.
Start with the rice. I like the long-cooking brown kind, which takes about 50 minutes, so I put it on just before I start with the vegetables. If you are on the white versus brown rice fence, remember that brown rice has more fiber, is more nutrient-dense, and is lower on the glycemic index than white rice. I'm just sayin'.
In a large skillet, saute in a bit of olive oil and a bit of soy sauce whatever veggies you have on hand. I used...
1 onion, thinly sliced
2 zucchini, thinly sliced longways (Is it 2 zucchini or 2 zucchinis?)
1 red bell pepper, thinly sliced
A handful of broccoli florets
1 small carton button mushrooms, chopped
I like to cook my chicken in a separate skillet. I have a phobia of raw meat, and the thought of raw chicken getting on my vegetables and then not cooking all the way out of them kind of makes me cringe. So, in another skillet, I heat up just a tad bit of olive oil as well as a shake of soy sauce and add...
2 boneless skinless chicken breasts, cut into sweet little chunks
The secret with the chicken is, once you put it in the hot skillet, not to mess with it for a few minutes. Let it sit for a little bit before you move it around. Once it's easy to separate with a utensil like a wooden spoon,** move it around and cook until it's good and sticky brown. I also like to add a little more soy sauce to the pan as the chicken soaks up the juices.
**Sidebar...The Coach is more than willing to do dishes for me after supper while I get Little Bit's bath ready. But I guarantee you, if I use a wooden spoon when I cook, I can go back in the kitchen and it will be spotless, all the dishes in the drainer, except for the wooden spoon. He won't touch it. I have no idea. It freaks him out. Likewise, if a plate has any bit of ketchup on it, that plate will keep the wooden spoon company in the dirty side of the sink until I rescue it.
Once everything is cooked, serve with rice on the bottom, topped with veggies, topped with chicken.
Yes, it looks super good. Trust me, it tastes even better. Enjoy!
Tuesday, January 11, 2011
Sausage and Lentil Stew
Adapted from Taste of Home, Best Light Recipes
Since there is about half an inch of snow covering at least 38% of the yard outside my window, I think that we are officially snowed in. And of course, on nights when you are snowed in, you must eat stew.
In the bottom (as if you could do this in any other part, like the top or the sides) of a large saucepan, saute...
1 onion, chopped into small pieces
3 carrots, peeled and chopped
3 cloves of garlic, minced
Turkey sausage, previously cooked and sliced into little lovable chunks
**Tonight I used 3 links of Italian turkey sausage. I boiled them for about 7 minutes, then sliced them and browned them in the bottom of the pot. In previous versions I have also used fully cooked turkey kielbasa, which seems to hold up just a little better to cooking.
When the veggies are tender enough for you and the sausage is brown enough for you, add to the pot...
1 can diced tomatoes
1 can chicken broth
3 cups water
1 cup dry lentils (Did you know that lentils are known as the powerhouse of legumes? I wish I was known as the powerhouse of legumes.)
3 small red potatoes, unpeeled and diced
Spices to your liking...I used close to a tsp of cumin, a few shakes of chili powder, a pinch of red pepper flake, and a bit of salt. Remember to be very accurate on these measurements.
Bring to a boil; cover and simmer for as long as you like. I left mine on for over three hours. Because I like my stew very simmered. I also like to cook supper during Little Bit's nap, which usually takes place around 1:00 in the afternoon, leaving a good long while for the stew to simmer.
The result? A hot bowl of love. I mean, lentil stew.
Mmmmm. Enjoy.
Hello World
Hello world.
I have decided that it is time to venture out...
and write about food.
I have been married for going on five years. In my younger and carefree days, I knew how to make, oh, probably 4 and a half meals. Then I married the Coach, who is very reluctant to spend ten to fifteen dollars on a plate of fettuccine Alfredo. So, it was either learn new things to cook or spend the rest of our lives eating spaghetti and quiche.
Then came the kicker. Before I got married, I tolerated a total of one vegetable (green beans) and zero fruits. My entire diet mostly consisted of macaroni and cheese. My personal trainer husband (who is extremely patient) started hinting around that macaroni and cheese is not actually its own food group (gasp). So, with much prayer and perseverance, and with many scrunched noses (which is an involuntary reflex, I really can't help it), over the course of the past four and a half years, my repertoire of fruits and vegetables has grown to too many to count. It truly is a miracle.
And so, I cook nearly every night for my family. We try to eat healthy and cheap (please excuse the grammar). We really do believe that we can honor the Lord by eating things that are good for our bodies and also by being good stewards of the money that He chooses to give us. So I thought I might try to start keeping up with our meals on this blog. Will I post every meal that I cook? Probably not. Some weeks, I'm sure, I will be more consistent than others. But I do love to cook, and I really love to eat, and I would love to share those two passions with anyone who cares to know!
So...bon appetit!1
Subscribe to:
Posts (Atom)